Katia (student and President of the Asian Pacific Islander Club) collaborated with Innovation Center on a katazome activity for her club. Katazome is a Japanese fabric dyeing process that uses a resist paste applied to fabric through a stencil, and we more or less followed the procedure detailed in Workshop no. 21: Natural Selections: Hands-on Katazome and Indigo with Graham Keegan.

Early this morning, Katia made the dough using rice flour and rice bran…

20190315_101505

…which we then steamed for an hour and half.

20190315_111426

Meanwhile, we used the laser cutter to cut out some stencils, based on traditional Japanese designs.

20190315_111607

While Katia smashed up the now cooked dough balls, adding glycerine and water with hydrated lime to make a paste…

20190315_122234

…other members of the club arrived, and set to work cutting cotton fabric into 8″x8″ squares…

20190315_122207

…and ironing the fabric to make it nice and flat for stenciling.

20190315_123351

The paste ready, students set to work applying it to the fabric…

20190315_130004

…and hanging the squares up to dry.

20190315_135025

Once the squares were dry, it was into the dye for 20 minutes…

20190315_145350
..then back on the line to dry again…

20190315_145342

…before being rinsed.

20190315_152611

The rinsed pieces now dry, Katia trimmed the edges with pinking shears…

20190315_162005

…while other students pressed the finished squares using the t-shirt press in the Clean Lab.

20190315_162439

The result!

20190315_165401

It’s exciting to find ways to combine traditional arts – katazome – with digital fabrication – the laser cutter – and we’ll incorporate what learned (a lot!) about the process and timing into v2.0 of the activity in a couple of weeks.

More photos from the activity:

Katazome in the Makerspace

Max Mahoney (Chemistry) and I spent a long day brewing a couple of batches of beer recently. Now familiar with the process and how to execute it in the makerspace, we were able to add lots of variables and processes and gear, building on our experience with Brew Day v2.0, and our original, somewhat less-than-successful Brew Day v1.0.

One of the biggest changes to the process this time around had to do with the water. Specifically, we started with deinonized (DI) water, and Max added various salts to create ideal water, which as I understand it is a big factor in the overall success of the end product.

Water Chemistry

We brewed two batches of beer, and one of kombucha, which we’re fermenting in one of the smaller fermenters.

From Brewer to Fermenter

Testing the pH using one of the new meters.

pH Checking

Improvised wort chiller, until our conterflow setup arrives.

RoboBrews Assemble!

Into the fermenters.

Two Brewers, Two Fermenters

We documented things more completely throughout the process this time. Timing notes are especially important, as we’re still working out how these brew days work as labs and activities. How many simultaneous batches make sense, and how many people can effectively work in the space at the same time.

Captain's Log

Meanwhile, batch the second looks and tastes pretty good, with some distinct and pleasant apricot notes.

The Color of Brew Day the Second

We’ve got both fermenters in The Spider Shed (a former chemical storage building that we’re repurposing as a nanobrewery) hooked up to a heating and cooling system, and they’re happily bubbling away.

Brew Day the Third

We’re still learning so much, and the process is becoming even more interesting. Max is especially stoked about tweaking the water chemistry, and has lots of ideas about wrapping class activities and labs around that process. A couple more days, and we’ll cold crash these batches and keg ’em up!

Students in ECE 452 – Making for Educators spent the last couple of class sessions working in groups to create pizza box pinball machines.

Photos from Day 1:

Pizza Box Pinball - Day 1

At the beginning of our second work day, we had a visit from Sylvia Libow Martinez, one of the authors of Invent to Learn, which we chose as the text for our course. Sylvia shared some of her philosophy about making and education, and answered questions from our students.

20190225_174701

After we said goodbye to Sylvia, students got back to work.

Photos from Day 2:

Pizza Box Pinball - Day 2

In action!

With version 1.0 of their projects finished, students processed the experience, with many particularly enjoying solving the engineering challenges of the project, including the plunger and flippers. We also shared the Learning and Facilitation Frameworks developed by The Tinkering Studio at the Exploratorium, and had a good conversation about assessment within the context of making. We’ve got a great group of students for the first run of this class, and we’re excited to see what they come up with next!

Today we got a look at the first prototypes of our mycelium-based 4″ planting pot project. Here’s how they looked, still in the forms.

20190221_103744

The “good” one – the one where the 3D printed PLA positive didn’t deform during the vacuum forming process – is really solid and feels done.

20190221_103819

The second one didn’t want to release from the form, which was not surprising, given how much deformation occurred during thermoformer’s heating cycle, so I had to cut it free from the pot, and use few paper clips to keep the top section attached to the more substantial base.

20190221_105257

Into the dehydrator at 100 degrees Fahrenheit for about three hours, and we’ll see how they feel after that.

20190221_105459

For this iteration, we used oat hay as the substrate, into which we mixed rye berries inoculated with King Oyster mushroom spawn. Since we set up v1, we’ve received a food processor, in order that we might more finely chop up the substrate, and we also have some other substrates in the shop, including rice hulls and various wood chips. V2 next!

With some new fermentation science gear on the ground, Max Mahoney (Professor of Chemistry and makerspace champion) and I decided to spend a day brewing a pale ale, following our first brew day some months ago. Brewing is mostly a lot of cleaning…

Cleaner

…and sterilizing…

Purge

…and waiting. Waiting for things to heat up. Waiting for things to cool down.

Soon To Be Pale Ale

Sparging is my special gift.

I, Sparger

After the sparge, we checked the brix with our new brix checker.

Brix Testing

We weren’t even close, but realized that we were sampling from the top, which was largely water from the sparge. After the boil, we took another reading, and we were right where we needed to be.

Not Even Close

Here we’re transferring from the Robobrew to the new Ss Chronical fermenter.

Gravity

The Chronical has a heating element, and we’ve got a chiller on the way. Here Max is setting the fermentation temperature.

The Number of the Beast

The brew complete, we set up a webcam to stream the bubbling so that we could monitor it over the long weekend. So far, so good! It’ll be maybe two weeks until we can sample the outcome.

Sometimes it seems like there are too many things happening in the Innovation Center to keep track of. This week felt like that. Here’s a recap:

Students in our new ECE course Making for Educators started working on their cardboard pinball machines, which they’ll finish up in our next class session.

Pizza Box Pinball Day 1

Max (student and amateur mycologist) harvested and cooked some pink oyster mushrooms, and pasteurized and inoculated some oat straw, packing it into our first two 4″ pot prototypes, which we made using a 3D printer and our vacuum former.

Mycelium Roundup

Some snazzy new stainless steel fermenting vessels arrived, and Max Mahoney (Chemistry professor and makerspace champion) assembled one in preparation for another brewing day as part of our fermentation science efforts.

Fermenter

Our staff hosted a Palentine’s Day Crafternoon event.

2019-02-14_09-18-39

Finally, visitors from both College of Alameda FabLab and Lichen K-8 came out to tour our space and talk about making…

Lichen School Visitors

A busy week, and the semester is just getting rolling.

A member of the community contacted me recently about the possibility of helping to repair a broken clock gear. We’ve got an Omax ProtoMAX in the shop, and this seemed like the perfect opportunity to use it for a compelling project. Steve sent me a photo of the broken piece, and I pointed him in the direction of geargenerator.com, a free online tool created by @AbelVincze that enables the creation of sophisticated gears, and will allow you to export your creations in DXF format.

Gear Generator

Steve did a lot of good work design work, and we traded files back and forth until I felt we were ready to cut a few prototypes for fit.

Gear Comparison

We spent some time in the lab measuring the gear and tweaking the file, adding the two auxiliary holes and the cutouts for the index tabs by hand in Illustrator…

2019-02-12_01-29-56

…after which we cut a couple of prototypes, first in wood to A/B with the original, and then in acrylic, which Steve took home to check for fit.

2019-02-12_01-30-27

The final acrylic prototype fit so well, in fact, that part of the brittle acrylic broke when Steve tried removing it. Success!

Gear Before

Steve then sourced some brass plate, and we were now ready to engage Hayes (student, makerspace employee, and ProtoMAX expert) to prepare the file for use with the waterjet to cut the final version. Steve and Hayes were able to cut a very close likeness of the original broken gear.

Match!

Steve took it home, installed it, and reports that the clock is working perfectly!

Gear After

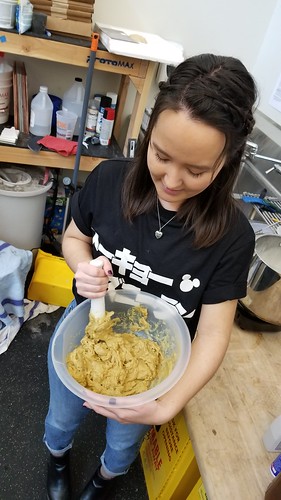
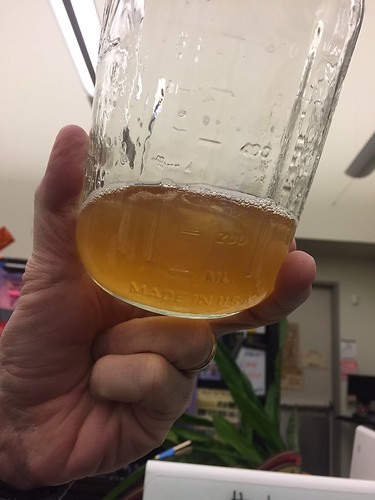
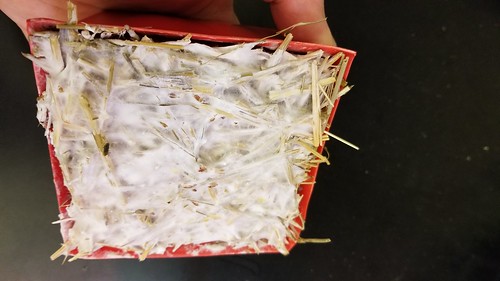
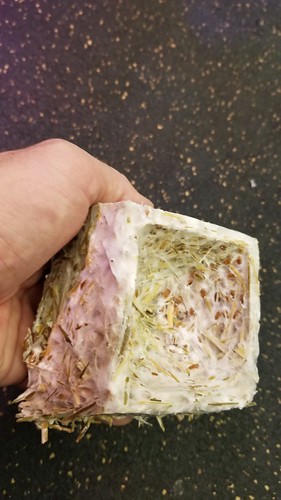
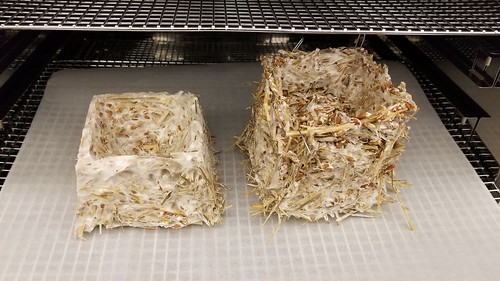
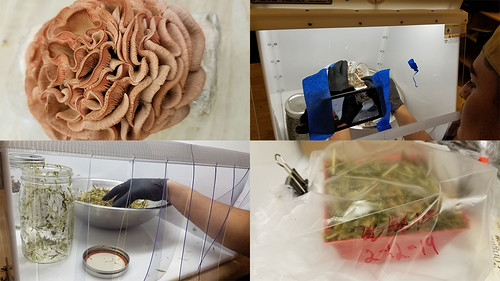
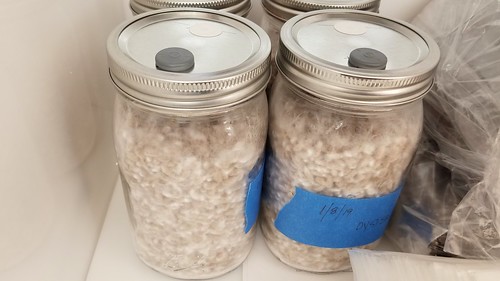
Finally got around to prototyping the first of what will hopefully be a variety of useful objects created from waste materials, knitted together with mycelium, part of our larger efforts with biofabrication, bioprinting, and fermentation science. As our first mycelium project, we’re trying to make a 4″ planting pot that can be composted. We’ve got oyster mushroom jars rolling, ready to inoculate a variety of materials, including straw, rice hulls, coffee grounds (we worked out a deal with the coffee cart on campus to gather their grounds), waste cardboard, and hopefully various combinations of those things.

Mycelium!

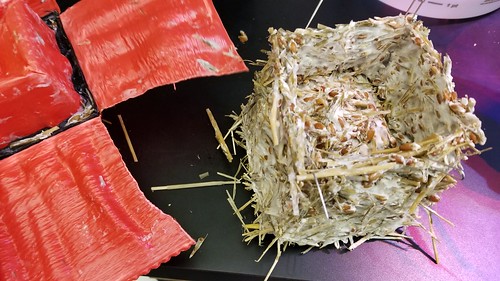
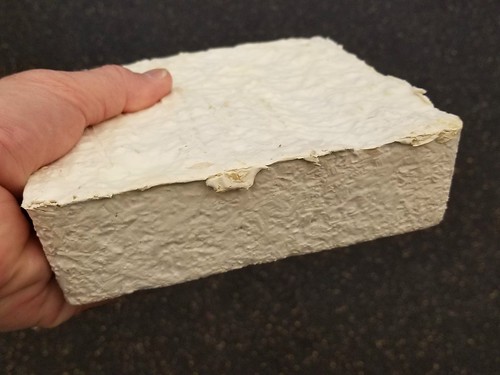
The sample mushroom packaging material arrived last week, so we’ve gotten to touch and feel and get a sense of a commercial version of the material.

Mushroom Packaging

I created a model of the pot using Tinkercad, with the goal of 3D printing it in PLA and then using that model to create the form using the Formech Compaq Mini. The vacuum former tends to hold onto objects, so I designed the inside and outside walls to slope slightly, the outsides toward the middle – / \ – and the insides away from the middle – \ /, which I thought might make the plastic mold more likely to let go of the model. It didn’t quite work out that way, but more on that later. I also included a hole in the center, partly for drainage, and partly because I thought it would aid in the vacuum forming process.

Plant Pot Model

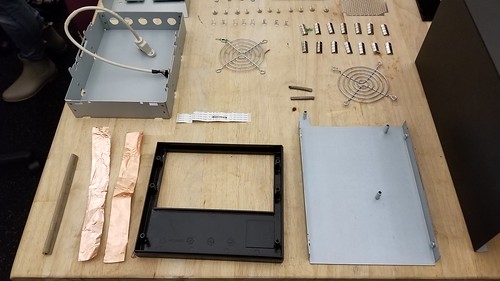
Hayes (student and Innovation Center staff) was kind enough to print the model to my specifications, which turned out to be wrong. More on that later. Anyhow, I asked for minimum infill, as the pot itself is 4″ at the base, and at least that tall, and I was interested in a quick print, rather than a durable one.

Printing the Pot

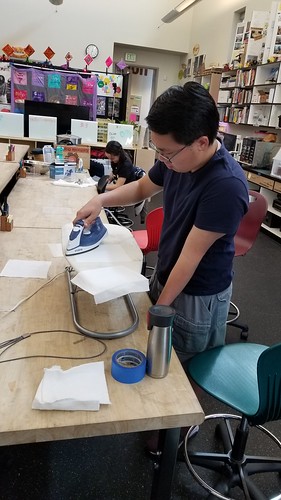
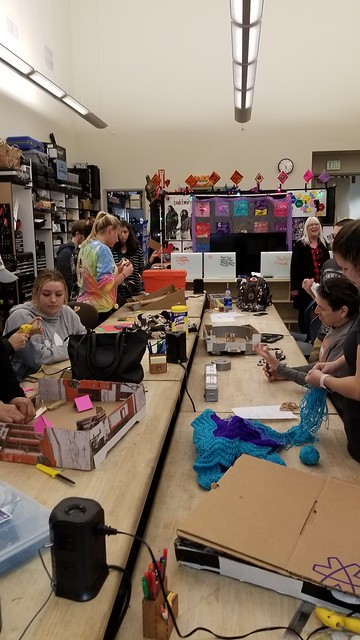
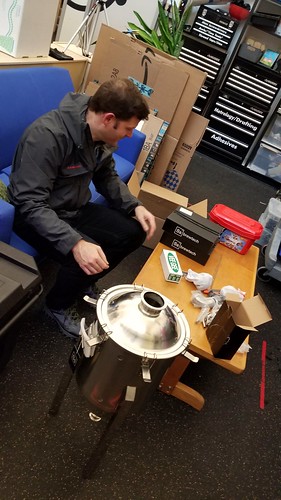
The model was ready this morning, so we set it up on the vacuum former.

Prototype In Place

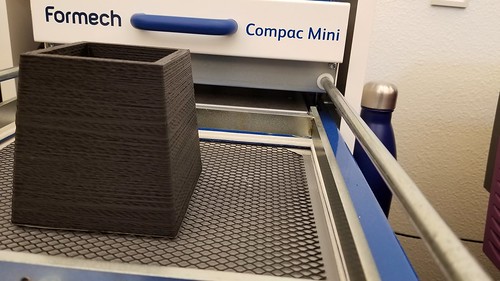
It took a few rounds of heating, because we didn’t realize that the frame that holds the plastic down and creates the seal that allows the vacuum to form was out of alignment. Once we solved that problem, the process seemed to work really well, except…

V1 Mycopot Model

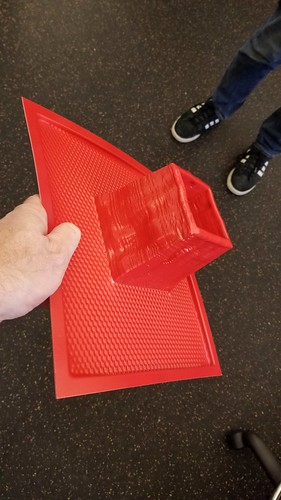
The repeated heating, coupled with my desire for a fast print rather than a strong one, added up to a mistake. Specifically, the PLA model melted and warped – you can see the jankiness above – and as a consequence, the model stuck in the deformed plastic sheet, and I had to pull it apart layer by layer to get it release.

V1 Mycopot Model Melted

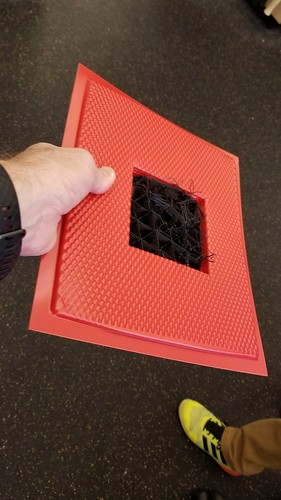
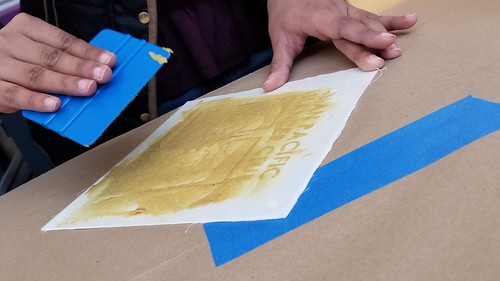
Even with the less than perfect walls, the form is more or less usable, but we’re going to print a much more solid version in PLA on the Ultimakers, and a more solid version using the Form2 and maybe the tough resin. We learned a lot from the process, which is the beauty of prototyping!

This semester, Jennifer Kraemer (professor of Early Childhood Education and makerspace champion) and I are teaching a new course we developed – Making For Educators – for the first time, a hands-on course to help educators incorporate making into their teaching practice. It’s the second of our discipline-lensed making courses, including Making Social Change, a Sociology course we’ve taught now twice, in which students explore social movements and the ways that those movements use tools to enact change. For ECE 452, we’re using the excellent Invent to Learn by Sylvia Libow Martinez (@smartinez) and Gary Stager, Ph. D. (@garystager) as our text, and the class meets in the makerspace.

Tinkering Night in ECE 452 - Making for Educators

Our most recent class session was focused on tinkering. Martinez and Stager define tinkering thus:

Tinkering is a mindset – a playful way to approach and solve problems through direct experience, iteration, experimentation, and discovery.

At the start of the class, we talked about the relationship between tinkering, making and engineering, shared some examples, and after a very brief discussion of safety – no plugging things in! – students chose an item from a pile of broken and obsolete printers, laptops and desktop computers, tape and optical drives, and other electronic detritus, and began the process of unscrewing cases, cutting cables, and generally deconstructing their items.

Tinkering Night in ECE 452 - Making for Educators

Most students worked independently, content to explore the guts of their chosen electronic devices, but a pair of students decided to work together, taking apart a tape backup drive…

Tinkering Night in ECE 452 - Making for Educators

and knolling the parts.

Knolled

Students settled quickly into the work, and were laughing and sharing and generally having a good time. Unsurprisingly perhaps, many reported never having seen the inside of a laptop or DVD drive, and they were excited to explore. At the end of the session, we asked them to share their thoughts and feelings as they tinkered.

Thoughts & Feelings While Tinkering

Students shared feelings of pride and satisfaction, and described the activity as therapeutic, relaxing, savage, confusing, and cathartic. After almost two years of development, it’s satisfying (and therapeutic, relaxing, savage, confusing, and cathartic) to get this class up and running, and we’re looking forward to learning alongside these brave and creative students.