Spring 2024 is already maybe the most vibrant semester in recent memory, even taking into account pre-pandemic semesters. Lots of energy in our student community, and lots of interesting projects, including our Free Little Art Gallery, for which we held an opening event where some folks dressed up for the occasion, and for which we had live music (provided by Lorenzo, a talented musician from our students community and Innovation Center regular).

Gallery Opening

We hung our 4th (or 5th?) show at the end of last week, including art from students, staff and families of staff, community organizations, other FLAGS in the U.S., and folks from a Northern California retreat center.

All the FLAG shows so far

The guest book we implemented says it all:

FLAG Guest Book

The maker-centered learning (MCL) professional development for teachers project I’ve been working on with John Pellman (Director of Curriculum and Instruction for Capital College & Career Academy) and the Sacramento County Office of Education (SCOE) is picking up speed. We held last month’s session at a fabulous space called Community Shop Class in the Oak Park area of Sacramento.

Community Shop Class PD

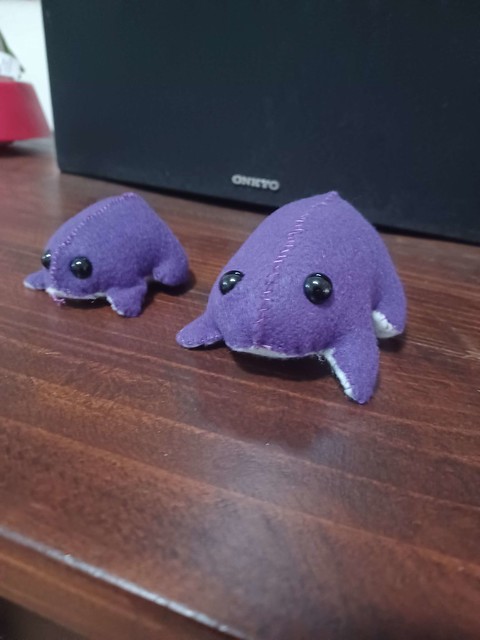
For our first student-led workshop since lockdown, Rox showed folks how to make plushies.

Plushie Making

Adorable.

plushie

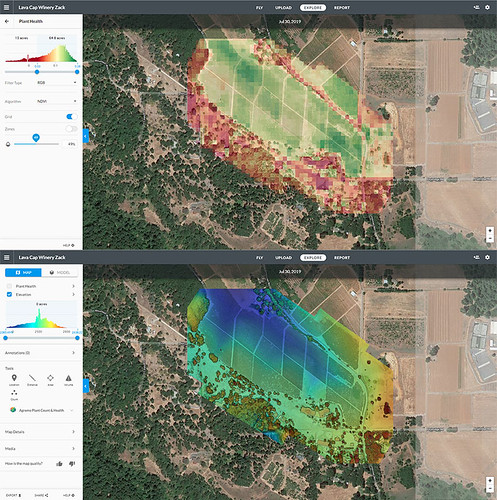
We’ve been flying our surveying quadcopter regularly to document construction progress on the new science building, which is coming along nicely.

science_building_january

Depending on many, many variables (far outside of my control), there’s a possibility that we might be able to expand the Innovation Center into the labs and classroom spaces that will be vacated once this new building is up and running.

DIY channels on YouTube are a source of inspiration, and lately I’ve been watching one in which the maker creates figures and environments inspired by Sylvanian Families.

https://youtu.be/_Ti2hTKZnmE

In one episode, the maker uses a DIY vacuum former (made from a plastic jar) to create little bottles. We have a commercial thermoformer in the lab – Sophie most recently used food safe plastic to create candy molds for our holiday party, and made this lovely Nova (our space bunny mascot) lollipop.

20221201_141500

I thought it would be fun to prototype a little DIY version, and so set out designing it, starting with a simple box (using Makercase, certainly in the top 10 of most useful makerspace software) to which I added holes for the vacuum hose and the top surface. A couple of iterations later, all glued and clamped up.

20221228_120206

Though I think it would have worked fine, I decided that the grid of vacuum holes needed to be smaller, so I altered the file in Illustrator and re-cut that piece with the laser cutter.

20221228_130520

I hooked up the vaccum and gave it a try, sandwiching plastic between various frames and heating it with a heat gun with promising but not perfect results. What ended up working best was just heating the plastic in place with a heat gun while the vacuum was running.

20221228_135952

Here’s a closeup shot of the resulting mold, which is a perfectly acceptable result for a quick protoype!

20221228_140208

The Innovation Center is collaborating with folks from the Equity Center, the PEAC²E (Peer Engagement for Achievement, Culture, Connection and Excellence) program, and Diane Carlson (Sociology) on a Peace Pole project. One of the many ideas that has emerged from the collaboration is to create a modular mobile “peace pole platform,” essentially a design specification and a set of affordances that will enable members of the college community – disciplines, student groups, classes, anybody – to create art and interactive content for display.

Peace Pole Platform Prototype Planning

Spent the day yesterday in the Innovation Center (I love having the lab to myself and locking in to the rapid prototyping flow), crafting a 1/4 scale prototype of the mobile modular peace pole platform prototype (M²P⁴?), and in particular exploring how the segments will connect. Nothing especially revolutionary about the basic design; each segment is a simple 12″ x 24″ rectangular box (our big laser has a cutting area of 18″ x 32″), and the pole itself will be three of these bolted together in a concealed way.

2022_peace_pole_quarter_scale_prototype

The big circle in the middle of each end piece (Illustrator file above) is the access port, and so I think I’ll be able to reach in and connect them together with bolts. There are other ways of creating access panels from the outside – I’m thinking magnetic – that I might explore just to make the connection process simpler.

20221210_135159

Three of these stacked will be about 6′, and provide 12 possible faces for art and expressions of peace.

20221210_140207

Version 1.0 will be “static” – crawl, walk, run – but the long-term goal is to have the base of the unit equipped with power, sound, and a Raspberry Pi or similar, such that folks have a set of givens they can design for. Think lights and sensors and haptics and interactivity. Two peace poles communicating at a distance? A receipt printer that provides folks with a prayer for peace they can take with them? Lots of possibilities!

We’ve been doing a bunch of work and prototyping in data sonification, for example playing weather data on music boxes, and building out a modular synth rig to provide realtime sound of sensor data. Max Mahoney (Chemistry) has been a key partner in the work, and has ideas about how we might sonify various chemical processes. The other day, we had the opportunity to do a rough prototype of sonifying liquid color change.

2022-01-14_12-06-18

The first prototype (above) involved simply adding food coloring to a beaker of water, and using the ADDAC 308 module to transform light data to CV, which when fed to the modular synth lowers the frequency of the audible sine wave. The second prototype involved more carefully controlling the light by placing the apparatus in a box, sticking a battery + LED on the outside of the beaker, and poking a hole in the side of the box for the light sensor and another in the top so we could use a syringe to introduce the food coloring. Here’s version 2:

Lots yet to do, but we think we’ve got a functional prototype that Max intends to use in the classroom this semester.

Louie Garcia (skillful electrician, Chair of Building Industries at Sierra College, and all-around inspiring maker) held a make-and-take workshop today on Lichtenberg wood burning machines as part of a Train the Trainer series organized by longtime supporter of regional manufacturing education Steve Dicus. Assembled from old microwave parts and assorted electrical castoffs – Louie is a true believer in creative reuse – each participant was able to build, test, and take their setup home. Suffice it to say that Lichtenberg wood burning can be a pretty dangerous endeavor, and is not to be trifled with, but Louie did a great job explaining the safe construction and operation of the system.

2021-12-11_05-06-49

My rig assembled and functional, I started wondering about using the laser cutter to etch a “suggestion” for the water to flow and by extension the electricity to follow, so I headed to the Innovation Center for some prototyping. To set up a very basic test, I created a file in Illustrator with simple lines from 1 pt to 7 pt. This I burned on hobby plywood using Danger Scissors (our big laser). I mixed up a solution of baking soda and water, using a syringe to apply the solution to the work piece, then hit it with the Lichtenberg burner.

Simple laser engraved lines enhanced using Lichtenberg wood burning.

Electricity seeks the path of least resistance, e.g., the water, so it more or less did exactly what I predicted it might (though with some welcome unpredictability)! We have a tradition in the IC of making Nova (our space bunny mascot) with any new piece of equipment or technology, so that was my next test.

Nova the Innovation Center space bunny burned on wood using the laser cutter, then enhanced using the Lichtenberg wood burning process.

So far, so good. I decided to try something with more intricate lines.

Here’s the finished piece.

Geometric design with Lichtenberg details

I’m really pleased with it – I love the juxtaposition of the precise lines of the laser and the organic and semi-unpredictable path of the electricity. For my next prototype, I decided to try some red oak, which I sanded and finished with some cutting board oil after burning.

Geometric design with Lichtenberg details

Now that I have an understanding of the process, the next step (I think) will be configuring the system with safety and throughput in mind. This video of a no-touch version has some ideas worth exploring, particularly in terms of making the process more practical and safe, and I’m looking forward to continuing to iterate on the setup and the process.

A couple of weeks ago, the Innovation Center hosted Lisa Danner (English) and her Creative Writing class for two class sessions about physicalizing poetry.

We started by introducing students to these really fun Metaphor Dice

20191106_112958

They rolled the dice, individually and in pairs, and then wrote and shared poems based on their dice rolls.

20191106_113856

Our overall goal was to get students to think about ways they might give physical form to their writing, so I asked Sophie and Sydney (two of our outstanding Makerspace Facilitators) to create some physical poem prototypes to help guide student thinking. They used the laser cutter and the embroidery machine and 3D printers and came up with these fantastic models.

2019-11-13_11-54-13

3D Fabric Printing

We talked about the many forms that poems (and words more generally) can take, from calligrams

Shiite Calligraphy symbolising Ali as Tiger of GodIshvara7 at English Wikipedia [CC BY 3.0], via Wikimedia Commons

…to the inspiring Viewfinding poetry and sculpture installation by artist Sarah Cook.

Students returned a week later to start physicalizing their own poems, some using glue guns and materials from our low-resolution prototyping cart, and others working with the laser cutter.

20191113_114640

It might be less obvious (to some folks, anyhow) about how English classes might use makerspace resources, but we think we’ve come up with an engaging instructional sequence, and hope to tweak and adapt and scale it up, exposing lots of different kinds of students to maker-centered learning.

Diane Carlson (Sociology) and I are teaching Making Social Change for the third time this semester. Last week, we worked through Indian independence, and students learned to spin roving into yarn with drop spindles they created using laser-cut whorls, dowels, and cup hooks.

20190916_150735

This week , we explore the radical democracy and political art of the Zapatista movement, after which students create stencils of an issue of their choice using the laser cutter. Mario Galvan, a local activist who has done work with the EZLN, shared his story with our students and showed images and videos of his visits to the caracoles of Chiapas.

20190923_132604

After Mario’s talk, students set to work creating stencils with the ever amazing Stencil Creator, after which we went out to the backyard and got out the rattle cans.

20190923_160142

20190923_160117

20190923_160019

This is our third time out for this class, and we try to expand/enhance/adapt the course each time we teach it. This year, we’re adding a field trip to The Creation District, which provides creative programming for youth experiencing homelessness, and we’re working to incorporate escape room mechanics into the final projects that students complete. Always be prototyping.

Jason Pittman (Geosciences), Max Mahoney (Chemistry) and I took the new quadcopter out to Lava Cap Winery to do a test flight.

Flying

Dronedeploy (the system we use for flight planning and analysis) offers some interesting post-flight map creation and analysis. Here are the Plant Health and Elevation views.

Plant Health and Elevation

We were stoked to see the Model view for the first time.
Model

We’re still figuring out what it all means, but we’re excited about the preliminary results!

Following our first successful public pour, we have committed to a quarterly brew, to be served at a series of “Art of Wine” events for Harris Center for the Arts members. The first of these will be in late August, so we gathered in the Innovation Center to brew another batch of our Kveik Pale Ale, and a Dry Irish Stout. As it happens, our hops were ready for harvest, so we started the day up in the bines, gathering flowers from our Cascade and Willamette plants.

Hops Harvester

We weighed and measured these, reserving some to be added “wet” to the pale ale, and the rest we put in the dehydrator to use in some future brew. 564 grams in total.

Cascade of Cascade

The water built – we start with DI water, and Max adds salts and things to create the ideal water for the particular recipe – we set about brewing. Brewing beer is a lot of waiting around, and a lot of cleaning and sanitizing. We got a chance to try out the new keg washer, which works a treat.

Keg Washer

We were joined this brew day by Nicole and John, both students and Innovation Center staff.

Also Sparging

Each of them had sparging duties.

Sparge!

Here are the hops in their natural habitat.

Hoppin'

Of all the gear we’ve been able to acquire, the counterflow chiller – the black coil below, just left of the Robobrew, which is used to bring the hot wort down to pitching temperature – has done the most to improve efficiency, and to reduce the amount of water required as part of the brewing process. An absolutely essential tool!

Counter Flow Chiller

With the beer into the fermenters, and safely housed in the Spider Shed, and with all the brewing gear clean and stowed, Max and Nicole took samples of our prior batch of lavender kombucha and beer…

Beer in Glass

after which Max entombed them in glass.

Sealed

We’ll do this for each of our brews, and put them in a yet-to-be-designed UV-resistant display case.

More photos from the day…

Another FermSci lab, this time about off flavors.

IMG_2131

As before, students started out in the lab…

IMG_2018

FermSciWorkshopPic

…and ended up in the Innovation Center for triangle test tasting, trying to identify off flavors…

20190510_144149

…in spiked brews.

20190510_151610

20190510_143830