Jason Pittman (Geosciences), Max Mahoney (Chemistry) and I took the new quadcopter out to Lava Cap Winery to do a test flight.

Flying

Dronedeploy (the system we use for flight planning and analysis) offers some interesting post-flight map creation and analysis. Here are the Plant Health and Elevation views.

Plant Health and Elevation

We were stoked to see the Model view for the first time.
Model

We’re still figuring out what it all means, but we’re excited about the preliminary results!

Got our new DJI Inspire 2 up in the air for the first time today!

2019-06-14_05-05-36

Using DroneDeploy for mission planning is surprisingly easy, and the quad is easy to control, with auto takeoff and auto landing.

The technology has come a long way since we built and flew our first quad back in 2012. We plan to use this one to continue to support remote sensing in the Geosciences, and to fly vineyards as part of our FermSci and viticulture efforts.

Gearing up for a field day
Kite? Check. Helium? Check. It takes quite a bit of gear to execute a proper field day. Professor Jason Pittman arranged a KAP/BAP field day, and we headed up to the wetlands on the north end of campus to meet students around noon. Following a brief safety talk and protocol orientation, one team set out to launch the balloon, while the other team assembled and attempted to launch the kite.

Filling balloon Number 1
Half-full, balloon #1 revealed some pinhole leaks, so we tried to move the gas to a second balloon, which didn’t work at all, and we popped the first one in the process. Fortunately, we were able to get one of the spares filled and in the air.

IMG_0273
The kite team struggled with inconsistent wind. After many heroic attempts, they eventually scrapped the launch and joined the balloon team to walk the wetlands.

IMG_0267
We flew for ~40 minutes, with the camera (iPhone on the picavet, running Timelapse at 10 second intervals), and captured some really good shots.  (Link:  The full set images from 04.24.15 BAP field day.)

BAP!
At 2 o’clock, we headed back to the cars to stow the gear and head out. A few students hung around and had a chance to fly our newest quad.

IMG_0281
All things considered, a successful field day.

iPhone/GoPro Mount Mashup
We’ve had some success using the iPhone for aerial imaging from kites, balloons, and quads, so I’ve been looking for a way to mount one to our new Phantom’s GoPro mounting base plate. A quick search of http://thingiverse.com returned this GoPro-compatible iPhone case created by N3W0NE (CC BY-NC-SA). I printed it out on our new Printrbot, and while it technically fits, it needs a little adjustment to be ideal for our situation.  Most GoPro and iPhone users want to mount cameras facing forward, but ours needs to be pointing straight down, which sometimes doesn’t quite work – various mounts and housings get in the way.  For this model to work correctly for our needs, it needs to be tweaked so that the GoPro mount bit is on the short edge of the iPhone.  Not a big deal, and I’m grateful that communities like Thingiverse exist, and that folks are willing to share their work.

thingiverse_contact_card


The new quadcopter arrived, and it flies like a dream right out of the box.  We’ve been looking for a stable, predictable (some would say boring) flyer, and this machine seems to fit the bill.  Excited to put it through its paces in the next few weeks!

Untitled

Spent some time in the workshop today in between meetings, and finally got the POV camera powered up and working. I fashioned a little custom wiring harness using JST connectors for power, reconfigured the A/V cable that came with the transmitter, and powered up the system.  Behold – video!  From left to right:  LiPo battery (in this case powering Tx and Rx), camera, battery powered field monitor, transmitter (this and the camera will be housed on the quadcopter), receiver, and antenna.

In other news, the HoverFly Pro (a version of the flight control board that has some useful features, including auto level) arrived as well, so I’m working on upgrading the quadcopter with that and the POV video system. I hope to be flying again – and exploring local lakes with the OpenROV – in the next couple of weeks!

I had the opportunity to attend ISKME’s Big Ideas Fest 2012 earlier in the week, at the lovely Ritz-Carlton Hotel in Half Moon Bay, California. On the third day of the conference, artist John Q of Spectral Q posed conference participants (along with a few hotel employees and passersby to fill in the gaps) in the shape of the golden spiral and the words “open ed.”  With everyone in position, two operators, one controlling the aircraft and one controlling the camera gimbal, used this burly hexcopter:

Untitled

to take this marvelous image:

openED Group Photo for Big Ideas Fest #bif2012
(Photo by AeriCam / Spectral Q)

The hex was truly a beast, and bested the strong onshore breezes seemingly with ease.  According to ISKME, a video will follow shortly.  Another use for the quadcopter?

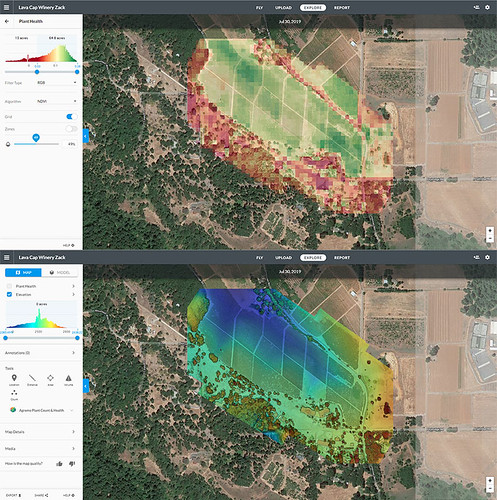
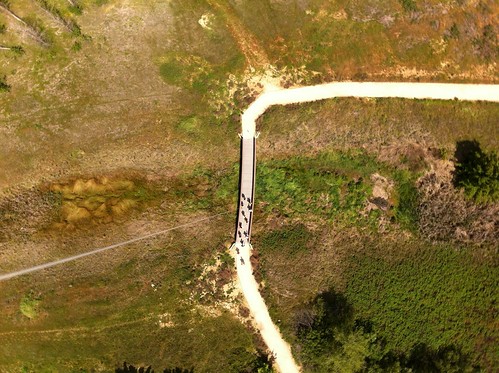
Having captured a few good aerial images, I turned them over to Jason Pittman, Professor of Geosciences and project co-conspirator. He georeferenced one of those images using ESRI ArcMap 10.1 – screen grab and details below.

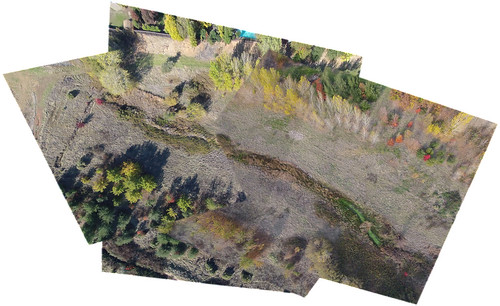
Here is a photo (captured last week by the copter) that has been georeferenced to a Google Earth Image of the same area.  Obvious advantage to our remote sensing data is the higher resolution imagery.  Photo is kind of wonky since I referenced it using optical cues to determine matching points in each image.  The coarse resolution of the GE image makes it difficult to line up with much precision.

The Google Earth image was georeferenced using known geographic coordinates (latitude and longitude) for the reference locations instead of relying on visual interpretation. This is a little faster and more precise.  Once we get the aerial targets we can GPS in those locations (using the more accurate Trimble GPS) and we will have known points with geographic coordinates.  Note the distortion on the north side of the image.  This is an uncorrected version of the photo and the “fisheye” effect is apparent.  The corrected mosaic you made is rad and will be a valuable step to add to our processing.  Cool thing now is that since it is georeferenced we can start over-laying existing data sets (roads, campus CAD maps, cross country trail vector file etc.).

Jason mentions the GoPro’s fisheye distortion, which is rather pronounced, and I’ve been working on correcting that.  There are many tutorials on YouTube detailing different methods of accomplishing the fix, though many of them rely on expensive, proprietary software – chiefly Adobe After Effects and Photoshop.  I’m still hunting for an open source or web-based way to do this, but since I have access to Adobe’s tools, I tried a few techniques, including processing the images using After Effects and the “cc lens” filter mentioned here, which seemed to do the trick, though some data is lost out at the edges of the photo.  In the next phase of the project, we’ll be using a different camera – likely a Canon PowerShot SX230 HS with CHDK installed – which should hopefully provide images with less distortion.

Jason also mentions aerial targets.  These are typically made from stitched 4 mil PVC, and feature corner grommets used to secure them temporarily to the ground.  They’re available from a variety of mapping supply companies and feature a few different patterns:

It seems like it would be simple enough to fabricate these DIY using foam core, so I’ll give that a shot, since we can’t fly anyway given the nonstop rain of late.

Update:  Here’s the Illustrator version of the aerial targets image, in case you want to print your own.

After some initial quadcopter sketchiness – mainly a yaw problem that I think was the result of a loose rotor – and a couple of crashes, I completed two successful flights this afternoon down in the wetlands, after which college police offered me a ride up to campus, my first time in the back of a police car.

first ever ride in the back seat of a cop car
The next step in the project involves getting the images into the GIS. Jason Pittman (Geosciences) is close to perfecting that process, and will be sharing it here in the next week or so. In the meantime, I decided to search the web for free software to accomplish the same task, and stumbled upon http://mapknitter.org, which is a sub-project of the fabulous Public Laboratory for Open Technology and Science, at http://publiclaboratory.org.

The Public Laboratory for Open Technology and Science (Public Lab) is a community which develops and applies open-source tools to environmental exploration and investigation. By democratizing inexpensive and accessible “Do-It-Yourself” techniques, Public Laboratory creates a collaborative network of practitioners who actively re-imagine the human relationship with the environment.

In a process that I’ll document in more detail soon, I was able to correct the GoPro Hero2’s fisheye distortion using Adobe After Effects. I then brought the corrected images into Map Knitter and aligned them to Google Maps using a combination of scale, rotate, and skew.  The software is intuitive, and exports in a variety of formats, including OpenLayers, TMS, OSM-style TMS, GeoTIFF and JPG.  Here’s my first take – it’s not perfect, but it’s a start.

Knitting Aerial Images
You can view the map in context at http://mapknitter.org/map/view/2012-11-27-flc-wetlands.