We’ve been doing a bunch of work and prototyping in data sonification, for example playing weather data on music boxes, and building out a modular synth rig to provide realtime sound of sensor data. Max Mahoney (Chemistry) has been a key partner in the work, and has ideas about how we might sonify various chemical processes. The other day, we had the opportunity to do a rough prototype of sonifying liquid color change.

2022-01-14_12-06-18

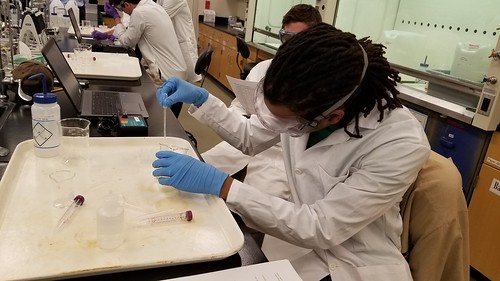
The first prototype (above) involved simply adding food coloring to a beaker of water, and using the ADDAC 308 module to transform light data to CV, which when fed to the modular synth lowers the frequency of the audible sine wave. The second prototype involved more carefully controlling the light by placing the apparatus in a box, sticking a battery + LED on the outside of the beaker, and poking a hole in the side of the box for the light sensor and another in the top so we could use a syringe to introduce the food coloring. Here’s version 2:

Lots yet to do, but we think we’ve got a functional prototype that Max intends to use in the classroom this semester.

Following our first successful public pour, we have committed to a quarterly brew, to be served at a series of “Art of Wine” events for Harris Center for the Arts members. The first of these will be in late August, so we gathered in the Innovation Center to brew another batch of our Kveik Pale Ale, and a Dry Irish Stout. As it happens, our hops were ready for harvest, so we started the day up in the bines, gathering flowers from our Cascade and Willamette plants.

Hops Harvester

We weighed and measured these, reserving some to be added “wet” to the pale ale, and the rest we put in the dehydrator to use in some future brew. 564 grams in total.

Cascade of Cascade

The water built – we start with DI water, and Max adds salts and things to create the ideal water for the particular recipe – we set about brewing. Brewing beer is a lot of waiting around, and a lot of cleaning and sanitizing. We got a chance to try out the new keg washer, which works a treat.

Keg Washer

We were joined this brew day by Nicole and John, both students and Innovation Center staff.

Also Sparging

Each of them had sparging duties.

Sparge!

Here are the hops in their natural habitat.

Hoppin'

Of all the gear we’ve been able to acquire, the counterflow chiller – the black coil below, just left of the Robobrew, which is used to bring the hot wort down to pitching temperature – has done the most to improve efficiency, and to reduce the amount of water required as part of the brewing process. An absolutely essential tool!

Counter Flow Chiller

With the beer into the fermenters, and safely housed in the Spider Shed, and with all the brewing gear clean and stowed, Max and Nicole took samples of our prior batch of lavender kombucha and beer…

Beer in Glass

after which Max entombed them in glass.

Sealed

We’ll do this for each of our brews, and put them in a yet-to-be-designed UV-resistant display case.

More photos from the day…

Another FermSci lab, this time about off flavors.

IMG_2131

As before, students started out in the lab…

IMG_2018

FermSciWorkshopPic

…and ended up in the Innovation Center for triangle test tasting, trying to identify off flavors…

20190510_144149

…in spiked brews.

20190510_151610

20190510_143830

Max Mahoney (Chemistry) and I spent a long day brewing a couple of batches of beer recently. Now familiar with the process and how to execute it in the makerspace, we were able to add lots of variables and processes and gear, building on our experience with Brew Day v2.0, and our original, somewhat less-than-successful Brew Day v1.0.

One of the biggest changes to the process this time around had to do with the water. Specifically, we started with deinonized (DI) water, and Max added various salts to create ideal water, which as I understand it is a big factor in the overall success of the end product.

Water Chemistry

We brewed two batches of beer, and one of kombucha, which we’re fermenting in one of the smaller fermenters.

From Brewer to Fermenter

Testing the pH using one of the new meters.

pH Checking

Improvised wort chiller, until our conterflow setup arrives.

RoboBrews Assemble!

Into the fermenters.

Two Brewers, Two Fermenters

We documented things more completely throughout the process this time. Timing notes are especially important, as we’re still working out how these brew days work as labs and activities. How many simultaneous batches make sense, and how many people can effectively work in the space at the same time.

Captain's Log

Meanwhile, batch the second looks and tastes pretty good, with some distinct and pleasant apricot notes.

The Color of Brew Day the Second

We’ve got both fermenters in The Spider Shed (a former chemical storage building that we’re repurposing as a nanobrewery) hooked up to a heating and cooling system, and they’re happily bubbling away.

Brew Day the Third

We’re still learning so much, and the process is becoming even more interesting. Max is especially stoked about tweaking the water chemistry, and has lots of ideas about wrapping class activities and labs around that process. A couple more days, and we’ll cold crash these batches and keg ’em up!

Toward the end of last semester – after lengthy and vigorous and unflinching hacking of red tape – we offered the first workshop – Beer Science: Measuring Beer Bitterness – as part of our ongoing Fermentation Science efforts. We started the day in the Chemistry lab, where Max Mahoney (Chemistry professor and makerspace faculty champion) described the chemistry of beer, and led students through a procedure for measuring beer bitterness.

20181109_122745

Here’s how Max describes it:

The goal of this workshop was to expose students to a quantitative and qualitative analysis of beer bitterness. The chemistry of hops and bittering compounds was presented along with a discussion of the chemical procedures involved in this analysis. The following procedure was used to quantitatively analyze beer bitterness. Three beers were selected containing different levels of the hop-derived bittering agents. Students sonicated the beer to expel carbon dioxide, performed a liquid-liquid extraction of the hop acids with iso-octane, and measured the UV and visible absorption spectrum for their sample. We used the visible absorption spectra to help classify the style of beer. The UV absorption was used to quantify the concentration of hop acids and thus the bitterness of the beer (measured in IBUs).

Chemistry students of all levels were able to learn advanced analytical methods used in the beverage industry to analyze beer bitterness. General and organic chemistry lab techniques were utilized including UV-Vis spectroscopy, usage of micropipettes, and liquid-liquid extraction of organic compounds.

20181109_130346

20181109_124717

20181109_125106

The Chemistry lab portion completed, we went over to the Innovation Center for some blind taste tests. Students sampled various beers, and then used PollEverywhere to report the perceived bitterness of the sample, the results of which we compared to the lab-derived values.

20181109_141610

20181109_143051

The event was a terrific success, and students were engaged and enthusiastic. We’ve got additional interdisciplinary FermSci workshops and projects planned for this semester, including more beer chemistry, sauerkraut making, curriculum development, and a partnership with a local employer for integrating IOT technology into kombucha fermentation.

The new semester has started, and things seem to be happening at a furious pace.

As part of professional development days preceding the semester, we invited faculty and staff for a makerspace update, and facilitated a prototyping workshop, solving problems having to do with babies and robots.

Flex Workshop Prototyping

Our staff did some outreach to invite students to participate in our community.

Falcons_Day

Also on the community front, we participated (for the third time) in the third annual Georgetown School Family Tinker Night, an event coordinated by our sister lab at Georgetown School. We brought out a 3D bioprinter and a plotter, and the ever popular Nova (our space bunny mascot) fresnel lens family face distorters.

Nova Faces

Meanwhile, back in the lab…

The jars we inoculated with mushroom spawn earlier in the month are thriving, and we’ll be scaling that project up soon.

Mycelium!

The Science Fish have returned from the library, as we plan and implement whatever v2.0 of our aquaponics efforts will look like. Yes, those are the same three fish – Phoebe, Phinley, and Phreud – still with us after more than two years, and yes, the water cleared up quickly and it’s crystal clear now.

2019-01-26_08-38-13

As part of the CCC Maker grant, we’re able to pay interns to do makerspace-related projects, and some of them are working on a large-scale, interactive periodic table of the elements, to be installed in our large lecture hall. Here Max Mahoney (Chemistry) and Nicole (makerspace facilitator extraordinaire) review some prototypes.

20181207_130554

We’re looking forward to starting the semester with a Grand Opening next week, and to continuing to advance various efforts, including FermSci and biotinkering, some salon-type events in the planning stages, and a million other things I’m probably forgetting. Onward and upward.

Chemistry Extra Credit Chips

Dominic Green (Chemistry) and I collaborated on these General Chemistry extra credit coins, and used the laser cutter to etch and cut them.   Dominic will distribute them to students who earn extra credit in class, and then collect and tally them at the end of the semester.

Max Mahoney (Chemistry) and I worked on a mechanical automata project this morning. Our long-term goal is to create laser cut wooden versions of the various mechanical mechanism building blocks in the beautiful book Karakuri: How to Make Mechanical Paper Models that Move by Keisuke Saka. To get a sense of what the design and development considerations might be, we decided to start with a Thingiverse search, and found Simple Machines – Geneva Stop (CC BY-NC-SA) by Zombie Cat. A few minor adjustments to the layout, and we cut the parts out of 1/4″(ish) hobby plywood. We ended up having to tweak a few of the parts to fit the dowels we had on hand, and we made a few slight modifications to the design based on the differences between the vector files and the thickness of our plywood, but overall it’s a great design and turned out pretty well for our first automata.

Geneva Drive

The rest of the afternoon was spent working with Nicole (student and Innovation Center staffer) on a stencil for organic chemistry.  Max hung around finishing the automata, and answered a few technical questions as Nicole and I worked through the layout in Illustrator.  We tested the first prototype, and decided that the various cut-outs representing the bonds needed to be scaled up a bit.  Below is version 2, including Nicole’s beloved chicken in the lower left hand corner, and a fancy star on the right.

Ochem Stencil

Test stenciling…

Nicole Testing the Stencil

The design finished and tested, we cut the final version out of acrylic.  Success!

Final Version Leaves the Laser

The file is up on Thingiverse, or you can just grab the PDF if you’d like to cut your own.

The pieces we ordered to build the volumetric display for Chemistry visualization finally arrived!  With the help of CJ, Nathan, and Rebekah (students), Max (Chemistry) got everything cabled up…

Assembly

Using bits from our original prototype, Max fired up a molecule, and it works!

Prototype, a Long Time in the Making

In order to better enjoy the three dimensional holographic molecules, we quickly cooked up a little blanket fort…

Building the Fort

Be Present

It Works!

Now that we have the parts in place, we can move on to developing the enclosure and making the system portable. It’s great to have the space, tools, and people to be able to turn good ideas into working prototypes, and we’re looking forward to making quick progress on this one (finally).